go语言本身带有runtime/pprof包,使用pprof可以查看程序profile信息(例如cpu、内存、goroutine等)。
一个项目中可能有很多服务,这些服务部署在k8s集群或不同节点,如果想查看某个服务的profile信息(前提是开启profile功能),通常需要找到该服务对应节点ip和端口,如果服务部署在k8s集群,可以通过端口映射、端口转发、ingress等方式获取服务的profile信息,有点麻烦,特别是服务多了之后,不容易管理和查看,为了方便管理,希望只需要知道服务名称就可以获取到对应服务的profile信息,不需要知道ip和端口,通过服务名称就可以查看该服务的profile信息。
具体实现步骤:
- (1) 使用自定义的路由(/goprofile/your-server-name)替换默认路由(/debug/pprof);
- (2) 使用nginx反向代理,根据路由转发请求到不同服务,然后使用负载均衡器转发请求到nginx服务。
1 在服务程序中获取profile信息
无论是web服务还是非服务,都可以做成通过http获取服务的profile信息,如果你的服务是web服务,刚好使用了gin框架,只需添加简单的几行代码即可,具体示例如下:
package main

import (
    "github.com/gin-contrib/pprof"
    "github.com/gin-gonic/gin"
)

var enableProfile bool

func init() {
    flag.BoolVar(&enableProfile, "enableProfile", "", "is enable go profile")
    flag.Parse()
}

func main() {
  r := gin.Default()
  if enableProfile {
    // 使用服务名称替换默认路由
    pprof.Register(r,"/goprofile/"+"your-server-name")
  }
  r.Run(":10060")
}
如果程序非gin框架程序,也可以通过gin伪造一个web服务出来放到goroutine去执行即可,具体示例如下:
package main

import (
    "github.com/gin-contrib/pprof"
    "github.com/gin-gonic/gin"
)

var enableProfile bool

func init() {
    flag.BoolVar(&enableProfile, "enableProfile", "", "is enable go profile")
    flag.Parse()
}

func profile() {
  r := gin.Default()
  // 使用服务名称替换默认路由
  pprof.Register(r,"/goprofile/"+"your-server-name")
  r.Run(":10060")
}

func main() {
  if enableProfile {
    go profile()
  }

  // run your code
  select{}
}
启动服务时开启profile功能:./your-app -enableProfile=true,开启profile功能后,在浏览器打开 http://
2 使用nginx做路由转发
新建一个nginx配置default.conf,文件内容如下:
server {
    listen       80;
    server_name  localhost;
    #charset koi8-r;
    #access_log  logs/host.access.log  main;

    location / {
        root   html;
        index  index.html index.htm;
    }

    location /goprofile/your-server-name1 {
        proxy_pass http://your-server-name1.com:8080/goprofile/your-server-name1;
    }

    location /goprofile/your-server-name2 {
        proxy_pass http://your-server-name2.com:8081/goprofile/your-server-name2;
    }

    error_page   500 502 503 504  /50x.html;
    location = /50x.html {
        root   html;
    }
}
把default.conf文件复制到/etc/nginx/conf.d/目录下,启动nginx服务,使用nginx代理方式可以通过服务名称访问对应profile信息。
使用反向代理遇到的301重定向问题,例如在浏览器访问http://xxx.com/abc,会重定向到http://xxx.com/abc/,也就是当请求URL后面没有/,nginx目录中没有对应的文件,就会自动进行 301并加上/。
解决方式:
在nginx的配置文件中,加上port_in_redirect off; 如果是nginx 版本号大于1.11.8,可以考虑使用absolute_redirect off;
注意: 在用chrome的时候,一定要先清除缓存在测试,chrome会自动将301缓存在本地。
3 在k8s获取golang程序的profile信息的完整示例
(1) golang程序开启profile功能
首先添加获取golang程序的profile信息功能,然后使用参数方式开启和关闭profile功能,默认是关闭状态,例如开启profile功能:./your-app -enableProfile
(2) 在k8s部署nginx代理
nginx配置文件go-profile-proxy-configmap.yml文件内容如下:
apiVersion: v1
kind: ConfigMap
metadata:
  name: go-profile-proxy-config
data:
  default.conf: |-
    server {
        listen       80;
        server_name  localhost;
        #charset koi8-r;
        #access_log  logs/host.access.log  main;

        location / {
            root   html;
            index  index.html index.htm;
        }

        location /goprofile/wq-account {
            proxy_pass http://wq-account-svc:80/goprofile/wq-account;
        }

        location /goprofile/wq-pcc {
            proxy_pass http://wq-pcc-svc:80/goprofile/wq-pcc;
        }

        location /goprofile/wq-monitor-msg-collect {
            proxy_pass http://wq-monitor-msg-collect-svc:80/goprofile/wq-monitor-msg-collect;
        }

        error_page   500 502 503 504  /50x.html;
        location = /50x.html {
            root   html;
        }
    }
部署nginx服务脚本文件go-profile-proxy-deployment.yml内容如下:
apiVersion: apps/v1
kind: Deployment
metadata:
  name: go-profile-proxy-dm
spec:
  replicas: 1
  selector:
    matchLabels:
      app: go-profile-proxy
  template:
    metadata:
      name: go-profile-proxy-pod
      labels:
        app: go-profile-proxy
    spec:
      containers:
      - name: go-profile-proxy
        image: nginx:1.15
        imagePullPolicy: IfNotPresent
        ports:
        - name: app-port
          containerPort: 80
        volumeMounts:
        - name: go-profile-proxy-vl
          mountPath: /etc/nginx/conf.d/
          readOnly: true

      volumes:
      - name: go-profile-proxy-vl
        configMap:
          name: go-profile-proxy-config
暴露nginx服务端口,部署脚本go-profile-proxy-svc.yml文件内容如下:
apiVersion: v1
kind: Service
metadata:
  name: go-profile-proxy-svc
spec:
  selector:
    app: go-profile-proxy
  type: NodePort
  ports:
  - name: app-svc-port
    port: 80
    targetPort: 80
    nodePort: 32280
在k8s启动nginx代理服务:
kubectl apply -f go-profile-proxy-configmap.yml
kubectl apply -f go-profile-proxy-deployment.yml
kubectl apply -f go-profile-proxy-svc.yml
在浏览器打开 http://
4 go程序性能分析
(1) 查看服务的prifile概况
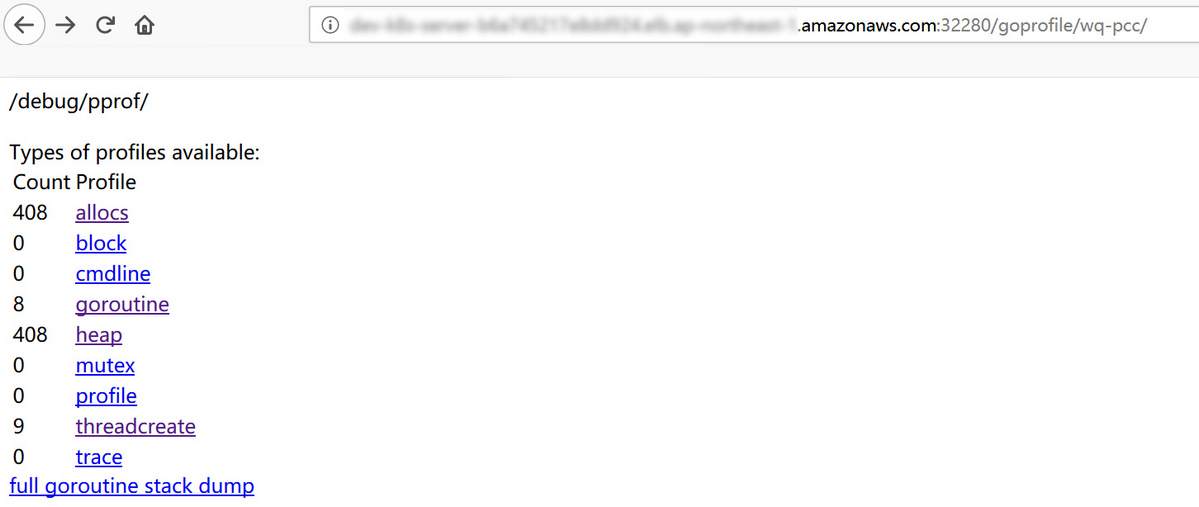
例如wq-pcc服务已开启了profile功能,这里使用负载均衡器域名和端口http://xxxxxx.elb.ap-northeast-1.amazonaws.com:32280转发请求到nginx服务,如果想查看wq-pcc服务的profile信息,在浏览器打开http://xxxxxx.elb.ap-northeast-1.amazonaws.com:32280/goprofile/wq-pcc即可,如下图所示:

(2) 具体分析服务的性能
收集服务wq-pcc在40秒内的cpu和内存信息,在这段时间内进行暴力压测,尽量让cpu占用性能产生数据,如果不指定时间,默认收集30秒。
go tool pprof --seconds 40 http://xxxxxx.elb.ap-northeast-1.amazonaws.com:32280/goprofile/wq-pcc/profile
go tool pprof --seconds 40 http://xxxxxx.elb.ap-northeast-1.amazonaws.com:32280/goprofile/wq-pcc/heap
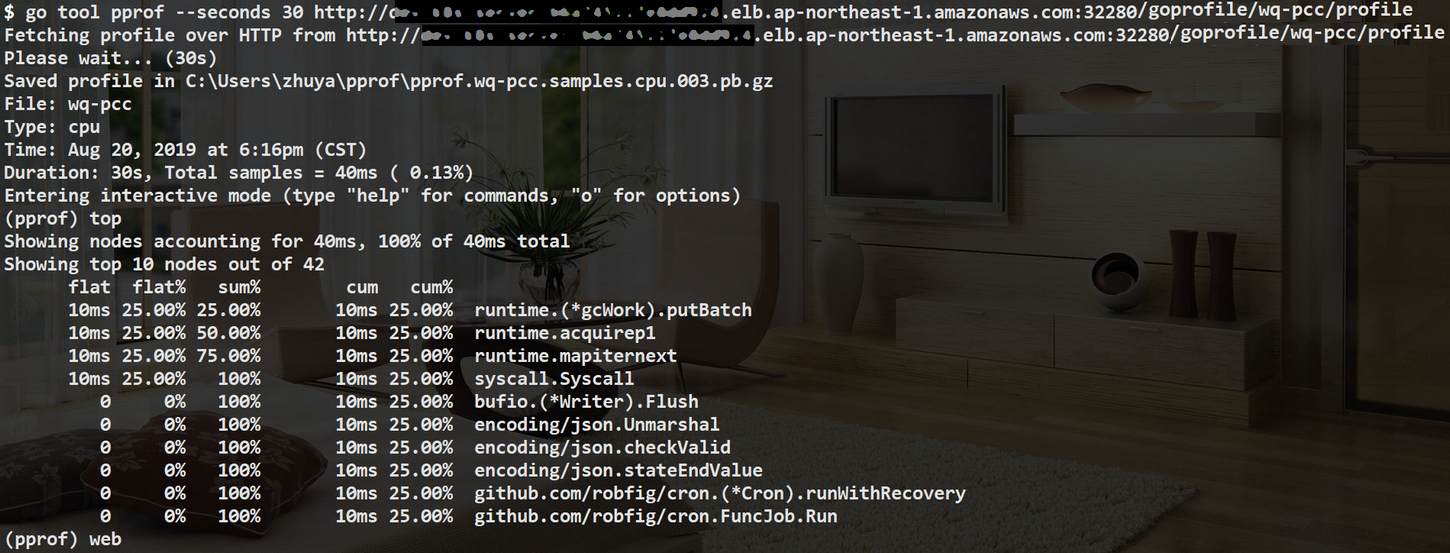
收集完毕后使用top或web命令查看信息详情,使用web命令要求本地安装Graphviz工具,如下图所示:

如果本地安装了FlameGraph和go-torch,可以查看火焰图,生成火焰图方法:
# 采集30秒的cpu数据
go-torch go-torch http://dev-k8s-server-b6a745217e8dd924.elb.ap-northeast-1.amazonaws.com:32280/goprofile/wq-pcc/profile -t 30
# 30s后go-torch完成采样,输出以下信息:Writing svg to torch.svg (torch.svg文件保存在安装路径$GOPATH/github.com/brendangregg/FlameGraph目录下)

在浏览器打开file:///Users/any/work/go/src/github.com/brendangregg/FlameGraph/torch.svg

火焰图的y轴表示cpu调用方法的先后,x轴表示在每个采样调用时间内,方法所占的时间百分比,越宽代表占据cpu时间越多。

在win10中无法生成svg,出现错误:flamegraph.pl: %1 is not a valid Win32 application,暂时未有解决方法,在mac或linux可以正常生成svg文件。
更多详细性能分析教程查看:https://blog.csdn.net/wangdenghui2005/article/details/99119941
专题「golang相关」的其它文章 »
- DeepSeek与Sponge黄金组合打造后端高效开发新范式 (Feb 09, 2025)
- 使用开发框架sponge快速把单体web服务拆分为微服务 (Sep 18, 2023)
- 使用开发框架sponge一天多开发完成一个简单版社区后端服务 (Jul 30, 2023)
- 一个强大的Go开发框架sponge,以低代码方式开发项目 (Jan 06, 2023)
- go test命令 (Apr 15, 2022)
- go应用程序性能分析 (Mar 29, 2022)
- channel原理和应用 (Mar 22, 2022)
- go runtime (Mar 14, 2022)
- go调试工具 (Mar 13, 2022)
- cobra基础与实践 (Mar 10, 2022)
- grpc基础与实践 (Nov 27, 2020)
- 配置文件viper库 (Nov 22, 2020)
- go语言开发规范 (Aug 28, 2019)
- goroutine和channel应用——处理队列 (Sep 06, 2018)
- golang中的context包 (Aug 28, 2018)